整合分布式⽂件系统
1.⽂件本地上传与提供访问服务
在开始介绍分布式⽂件系统之前,先来看⼀下使⽤本机存储来存放⽂件资源。
⼆者的核⼼实现过程是⼀样的:
- 上传⽂件,保存⽂件(本节是本地磁盘)
- 返回⽂件 HTTP 访问服务路径给前端,进⾏上传之后的效果展示
⼀、复习
服务端接收上传的⽬的是提供⽂件的访问服务,那么对于 SpringBoot ⽽⾔,有哪些可以提供⽂件访问的静态资源⽬录呢?
- classpath:/META-INF/resources/
- classpath:/static/
- classpath:/public/
- classpath:/resources/
静态资源都在 classpath 下。那么就出现了问题:
- 应⽤的⽂件资源不能和项⽬代码分开存储(你⻅过往 github 上传代码,还附带项⽬⽂件数据的么?)
- 项⽬打包困难,当上传的⽂件越来越多,项⽬的打包 jar 越来越⼤。
- 代码与⽂件数据不能分开存储,就意味着⽂件数据的备份将变得复杂
⼆、⽂件上传⽬录⾃定义配置
怎么解决上述问题?
别忘记了 spring boot 为我们提供了使⽤ spring.resources.static-locations配置⾃定义静态⽂件的位置。
web:
upload-path: /Users/apple/Desktop
spring:
resources:
   static-locations: classpath:/META-INF/resources/,classpath:/resources/,classpath:/static/,classpath:/public
/,file:${web.upload-path}
配置 web.upload-path 为与项⽬代码分离的静态资源路径,即:⽂件上传保存根路径
配置 spring.resources.static-locations,除了带上 Spring Boot 默认的静态资源路径之外,加上 file:${web.upload-path}指向外部的⽂件资源上传路径。该路径下的静态资源可以直接对外提供 HTTP 访问服务。
三、⽂件上传的 Controller 实现
详情看代码注释
@RestController
public class FileUploadController {

    //绑定⽂件上传路径到uploadPath
    @Value("${web.upload-path}")
    private String uploadPath;

    SimpleDateFormat sdf = new SimpleDateFormat("yyyy/MM/dd/");

    @PostMapping("/upload")
    public String upload(MultipartFile uploadFile, HttpServletRequest request) throws IOException {

        // 在 uploadPath ⽂件夹中通过⽇期对上传的⽂件归类保存
        // ⽐如:/2019/06/06/cf13891e-4b95-4000-81eb-b6d70ae44930.png
        String format = sdf.format(new Date());
        File folder = new File(uploadPath + format);
        if (!folder.isDirectory()) {
            folder.mkdirs();
       }

        // 对上传的⽂件重命名,避免⽂件重名
        String oldName = uploadFile.getOriginalFilename();
        String newName = UUID.randomUUID().toString() + oldName.substring(oldName.lastIndexOf("."), oldName.length());

        // ⽂件保存
        uploadFile.transferTo(new File(folder, newName));

        // 返回上传⽂件的访问路径
        //https://localhost:8888/2020/10/18/a9a05df4-6615-4bb5-b859-a3f9bf4bfae0.jpg
        String filePath = request.getScheme() + "://" +request.getServerName() + ":" + request.getServerPort() + "/"   + format + newName;
        return filePath;
   }
}
四、写⼀个模拟的⽂件上传⻚⾯,进⾏测试
把该 upload.html ⽂件放到 classpath:public ⽬录下,对外提供访问。
<!DOCTYPE html>
<html lang="en">
  <head>

    <meta charset="UTF-8" />

    <title>upload</title>
  </head>
  <body>
    <form action="/upload" method="post" enctype="multipart/form-data">
         <input type="file" name="uploadFile" value="请选择上传⽂件" />
       <input type="submit" value="保存" />
    </form>
  </body>
</html>
访问测试、点击“选择⽂件”,之后保存
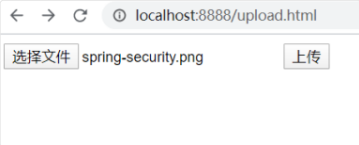
⽂件被保存到服务端的 web.upload-path 指定的资源⽬录下,浏览器端响应返回⼀个⽂件 HTTP 访问路径。
使⽤该 HTTP 访问路径,在浏览器可以看到上传的图⽚。证明我们的⽂件已经成功上传到服务端。
2. MinlO 简介与选型介绍
⽬前可⽤于⽂件存储的⽹络服务选择有很多,⽐如阿⾥云 OSS、七⽜云、腾讯云等等,但是收费都有点⼩贵。为了帮公司节约成本,之前⼀直是使⽤ fastDFS 作为⽂件服务器,准确的说是图⽚服务器。直到我发现了 MinIO,我决定放弃 FastDFS。下⾯我从对⽐的⻆度来说说我为什么果断的放弃了 fastDFS,转⽽使⽤ MinIO 作为图⽚存储服务器。
⼀、为什么使⽤ MInIO 替换了 FastDFS
MinIO 是⼀个基于 Apache License v2.0 开源协议的对象存储服务。它兼容亚⻢逊 S3 云存储服务接⼝,⾮常适合于存储⼤容量⾮结构化的数据,例如图⽚、视频、⽇志⽂件、备份数据和容器/虚拟机镜像等,⽽⼀个对象⽂件可以是任意⼤⼩,从⼏ kb 到最⼤ 5T 不等。
理由⼀:安装部署(运维)复杂度
如果要将⼀个 fastDFS 分布式服务部署完成,需要具备以下的知识:
linux 基础的⽬录操作
常⽤的分布式主从原理
C 语⾔代码的编译
nginx 安装部署
nginx 插件的使⽤(防盗链)
fastdfs 部署结构⽐较复杂。看了 MinIO 的分布式的部署分布式 MinIO 快速⼊⻔,放弃 fastdfs 的决⼼就会愈发明显。
fastdfs 的部署是零件的组装过程,需要你去理解 fastDFS 的架构设计,才能够正确的安装部署。MinIO 在 安装的过程是⿊盒的,你不⽤去深⼊关注它的架构,也不需要你进⾏零件组装,基本上可以做到开箱即 ⽤。普通的技术⼈员就能够参与后期运维。
理由⼆:⽂档
fastdfs 也有⼗年了,没有官⽅⽂档,所有的⽂档全是某某公司的⽹友总结的⽂档。从这点上看 fastdfs 真的是⼀败涂地,当然发明者:阿⾥的余庆⼤神在做这个项⽬的时候可能也没有考虑 到后来会有这么多⼈⽤。
理由三:开源项⽬运营组织
fastdfs 是阿⾥余庆做的⼀个个⼈项⽬,在⼀些互联⽹创业公司中有应⽤,没有官⽹,不活跃,⽬前已经很少做更新。 MinIO ⽬前是由 2014 年在硅⾕创⽴的公司 MinIO.Inc 运营的开源项⽬,社区论坛的活跃度⽬前也⾮常的不错。
理由四:UI 界⾯
我们都知道 fastdfs 默认是不带 UI 界⾯的,⽽下⾯是 MinIO 的界⾯,这个界⾯不需要单独部署,和服务端⼀并安装,开箱即⽤。

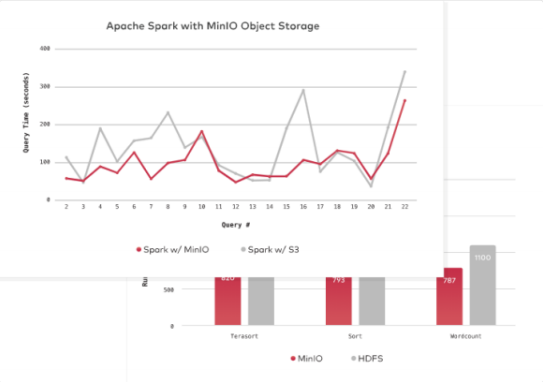
理由五:性能
MinIO 号称是世界上速度最快的对象存储服务器。在标准硬件上,对象存储的读/写速度最⾼可以达到 183 GB/s 和 171 GB/s。关于 fastDFS 我曾经单线程测试写了 20 万个⽂件,总共 200G,⼤约⽤时 10 个⼩ 时。总体上是很难达到 MinIO“号称的”以 G 为单位的每秒读写速度。
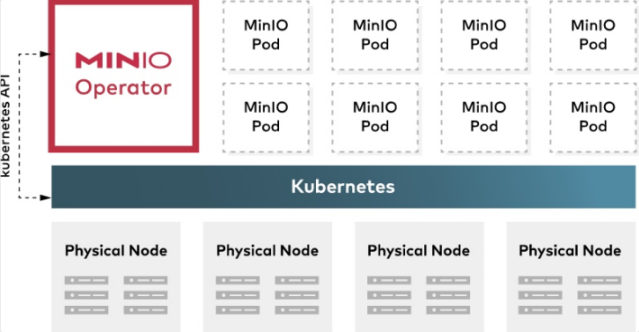
理由六:容器化⽀持
MinIO 提供了与 k8s、etcd、docker 等容器化技术深度集成⽅案,可以说就是为了云环境⽽⽣的。这点是 Fastdfs 不具备的。
理由七:丰富的 SDK ⽀持
fastDFS ⽬前提供了 C 和 Java SDK ,以及 PHP 扩展 SDK。
下图是 MinIO 提供的 SDK ⽀持,MinIO ⼏乎提供了所有主流开发语⾔的 SDK 以及⽂档。

理由⼋:AWS S3 标准兼容
Amazon 的 S3 API 是对象存储领域的事实标准。MinIO 是 S3 兼容性的事实上的标准,是第⼀个采⽤ API 和第⼀个添加对 S3 Select ⽀持的标准之⼀。包括微软 Azure 在内的 750 多家公司使⽤ MinIO 的 S3 ⽹关,这⼀数字超过了业内其他公司的总和。

现在为了节约成本使⽤ MinIO,等你的公司壮⼤了、有钱了。不想⾃⼰运维基础设施了,就可以把对象存储放到云上,只要云⼚商⽀持 S3 标准(⽐如阿⾥云 OSS、七⽜云等),应⽤程序是不需要重新开发的。
3. MinIO 的安装与基础⽤法
⼀、安装
我们使⽤ Docker 来安装 MinIO,步骤如下:
- 拉取镜像
docker pull minio/minio- 创建并运⾏容器
docker run -it --name minio -p 9000:9000 -p 9001:9001 -d
-v /usr/local/docker/minio/data:/data
-v /usr/local/docker/minio/config:/root/.minio
-e 'MINIO_ROOT_USER=admin'
-e 'MINIO_ROOT_PASSWORD=admin123'
minio/minio server /data --console-address ":9001"
开启相应的安全组端⼝
访问:http://124.222.178.129:9000
账号:admin,密码:admin123
9000:API 调⽤端⼝
9001:控制台端⼝,不指定会随机⽣成。注:控制台⽤ 9000 也能打开,最终会跳转到 9001,效果是⼀样的
防⽕墙相关
minio默认的服务端⼝是9000,需要开放防⽕墙端⼝
firewall-cmd --zone=public --add-port=9000/tcp --permanent
firewall-cmd --reload- 查看端⼝是否开放
firewall-cmd --query-port=9000/tcp开启防⽕墙:systemctl start firewalld
关闭防⽕墙:systemctl stop firewalld
重启防⽕墙:systemctl restart firewalld
相关⽂档
- https://min.io/
- https://github.com/minio/minio-java/tree/release/examples
- https://github.com/minio/minio-java/blob/release/docs/zh_CN/APl.md
⼆、使⽤
- 登录

- 创建 bucket


- 上传⽂件


● 修改 bucket 访问策略为公开


- 访问

4. 整合 MinIO 的 JavaSDK
⼀、整合 MinIO
pom.xml 引⼊:
<dependency>
    <groupId>io.minio</groupId>
    <artifactId>minio</artifactId>
    <version>7.1.0</version>
</dependency>
application.yml,服务信息要和我们上⼀节安装的 MinIO 服务⼀致,这样我们才能正常连接测试:
minio:
  endPoint: http://124.222.178.129:9000
  accessKey: admin
  secretKey: admin123
写⼀个⼯具类,这个⼯具类只为⼤家演示了基础的 API。
更多的 API 请参考官⽅⽂档:https://docs.min.io/cn/java-client-api-reference.html
package top.syhan.boot.file.utils;
import io.minio.*;
import org.springframework.beans.factory.annotation.Value;
import org.springframework.context.annotation.Configuration;
import org.springframework.stereotype.Component;
import javax.annotation.PostConstruct;
import java.io.InputStream;
/**
* @description: MinIO⼯具类
* @author: syhan
* @date: 2022-04-14
**/
@Component
@Configuration
public class MinIoTemplate {
    @Value("${minio.endPoint}")
    private String endPoint;
    @Value("${minio.accessKey}")
    private String accessKey;
    @Value("${minio.secretKey}")
    private String secretKey;
    private MinioClient instance;

    @PostConstruct
    public void init() {
        instance = MinioClient.builder()
               .endpoint(endPoint)
               .credentials(accessKey, secretKey)
               .build();
    }

    /**
     * 判断 bucket是否存在
     */
    public boolean bucketExists(String bucketName) throws Exception {
        return instance.bucketExists(BucketExistsArgs.builder().bucket(bucketName).build());
    }

    /**
     * 创建 bucket
     */
    public void makeBucket(String bucketName) throws Exception {
        boolean isExist = this.bucketExists(bucketName);
        if (!isExist) {
            instance.makeBucket(
                    MakeBucketArgs.builder()
                           .bucket(bucketName)
                           .build());
       }
    }

    /**
     * ⽂件上传
     *
     * @param bucketName bucket名称
     * @param objectName 对象名称,⽂件名称
     * @param filepath   ⽂件路径
     */
    public ObjectWriteResponse putObject(String bucketName, String objectName, String filepath) throws Exception {
        return instance.uploadObject(
                UploadObjectArgs.builder()
                       .bucket(bucketName)
                       .object(objectName)
                       .filename(filepath).build());
    }

    /**
     * ⽂件上传
     *
     * @param bucketName bucket名称
     * @param objectName 对象名称,⽂件名称
     * @param inputStream ⽂件输⼊流
     */
     public ObjectWriteResponse putObject(String bucketName, String objectName, InputStream inputStream) throws Exception {
        return instance.putObject(
               PutObjectArgs.builder()
                      .bucket(bucketName)
                      .object(objectName).stream(inputStream, -1, 10485760)
                      .build());
    }

    /**
      * 删除⽂件
      *
      * @param bucketName bucket名称
      * @param objectName 对象名称
      */
    public void removeObject(String bucketName, String objectName) throws Exception {
       instance.removeObject(
                 RemoveObjectArgs.builder()
               .bucket(bucketName)
               .object(objectName)
               .build());
    }
}
⼆、测试
写⼀个测试⽤例测试上⾯的⽅法
package top.syhan.boot.file;
import top.syhan.boot.file.utils.MinIoTemplate;
import io.minio.ObjectWriteResponse;
import org.junit.jupiter.api.Test;
import org.junit.jupiter.api.extension.ExtendWith;
import org.springframework.boot.test.context.SpringBootTest;
import org.springframework.test.context.junit.jupiter.SpringExtension;
import javax.annotation.Resource;
/**
* @description:
* @author: syhan
* @date: 2022-04-14
**/
@SpringBootTest
@ExtendWith(SpringExtension.class)
public class MinIoTest {
    @Resource
    private MinIoTemplate minIoTemplate;

    //测试创建bucket
    @Test
    void testCreateBucket() throws Exception {
        minIoTemplate.makeBucket("hello");
    }

    //测试上传⽂件对象
    @Test
    void testPutObject() throws Exception {
        ObjectWriteResponse response = minIoTemplate.putObject("hello",
                "img/banner.jpg",
                "/Users/syhan/Pictures/横版背景/img7.jpg");
        System.out.println(response.object());
    }

    //测试删除⽂件对象
    @Test
    void testDeleteObject() throws Exception {
        minIoTemplate.removeObject("hello", "img/banner.jpg");
    }
}- 第⼀个测试⽤例创建⼀个名称为 hello 的 bucket
- 第⼆个测试⽤例上传了⼀个图⽚⽂件对象
- 第三个测试⽤例把图⽚⽂件对象删除需要注意的是当⽂件对象名称中包含⽂件夹分隔符“/”的时候,会⾃动创建⽂件⽬录。
- MinIO 不提供⽂件⽬录的创建 API,⽂件⽬录随着⽂件上传动作创建。objectName 可以是/temp/xxx.jpg,可以认为⾃动创建了 temp ⽬录。
- MinIO 不提供删除⽬录的 API,把⽂件⽬录下的所有⽂件都删除,就等于⽂件⽬录被删除。
5. fastdfs 简介及架构说明
⼀、简介
- fastdfs 是⼀个轻量级的开源分布式⽂件系统。
- fastdfs 主要解决了⼤容量的⽂件存储和⾼并发访问的问题,⽂件存取时实现了负载均衡。
- fastdfs 实现了软件⽅式的 RAID,可以使⽤廉价的 IDE 硬盘进⾏存储
- ⽀持存储服务器在线扩容
- ⽀持相同内容的⽂件只保存⼀份,节约磁盘空间
- fastdfs 特别适合⼤中型⽹站使⽤,⽤来存储资源⽂件(如:图⽚、⽂档、⾳频、视频等等)
⼆、架构说明
- Tracker:管理集群,tracker 也可以实现集群。每个 tracker 节点地位平等。收集 Storage 集群的状态。
- Storage:实际保存⽂件 Storage 分为多个组,每个组之间保存的⽂件是不同的。每个组内部可以有多个成员。组成员内部保存的内容是⼀样的,组成员的地位是⼀致的,没有主从的概念。
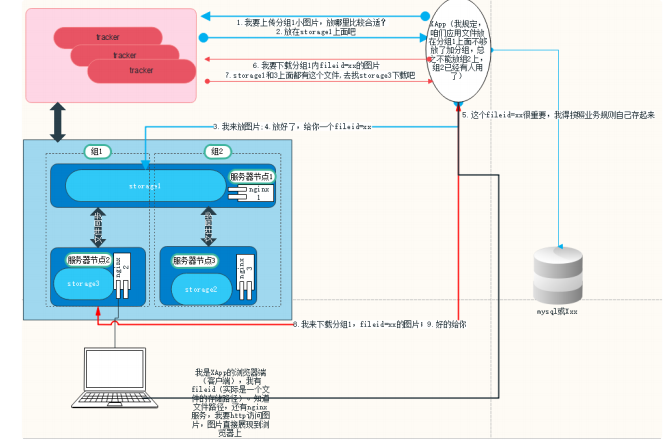
说明: nginx + fileid(⽂件路径),http 访问
三、好处
将文件的管理与具体业务应用解耦,可以多个应用共用一套 fastDFS 集群,分成不同的组。
图片访问,只需要将 http-ur 交给浏览器。nginx 提供访问服务。
方便统一备份,一组的多个 storage 就是彼此的备份。
可以将图片浏览,文件下载的压力分散给 nginx 服务。应用自己专心做业务。
缩略图,防盗链等等。
6. 使用 docker 安装 Fastdfs
一、安装
- 拉取镜像
docker pull delron/fastdfs- 创建本机存储目录
rm -fR /home/docker/fastdfs/{tracker,storage}
mkdir /home/docker/fastdfs/{tracker,storage} -p- 启动 tracker
docker run -d \
--network=host \
--name tracker \
-v /home/docker/fastdfs/tracker:/var/fdfs \
delron/fastdfs tracker- 启动 storage(改成⾃⼰的地址)
docker run -d \
--network=host \
--name storage \
-e TRACKER_SERVER=124.222.178.129:22122 \
-v /home/docker/fastdfs/storage:/var/fdfs \
-e GROUP_NAME=group1 \
delron/fastdfs storage
二、开启宿主机防火墙端口
morunchang/fastdfs 镜像在构建的时候,为 nginx 配置的端⼝是 8888(开相应安全组)
firewall-cmd --zone=public --add-port=22122/tcp --permanent
firewall-cmd --zone=public --add-port=23000/tcp --permanent
firewall-cmd --zone=public --add-port=8888/tcp --permanent
firewall-cmd --reload
# 查看是否开放
firewall-cmd --query-port=22122/tcp
firewall-cmd --query-port=23000/tcp
firewall-cmd --query-port=8888/tcp
三、测试安装结果
FastDFS 安装包中,⾃带了客户端程序,可以使⽤这个命令⾏客户端进⾏⽂件上
传及下载测试。 在宿主机执⾏命令
- 上传⽂件(是容器⾥⾯的⽂件)
docker exec -i storage /usr/bin/fdfs_upload_file /etc/fdfs/client.conf
./README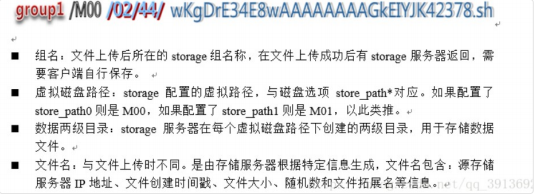
返回结果(序号不⼀定⼀样)group1/M00/00/00/wKgBW10lZHCAC8TaAAAAMT6WPfM3645854- 查看 fastdfs ⽂件系统信息
docker exec -i storage fdfs_file_info /etc/fdfs/client.conf
group1/M00/00/00/wKgBW10lZHCAC8TaAAAAMT6WPfM3645854
# 结果
source storage id: 0
source ip address: 192.168.1.91
file create timestamp: 2019-07-10 04:07:12
file size: 49
file crc32: 1050033651 (0x3E963DF3)- 下载⽂件,不会下载到宿主机,要到去容器⾥⾯看(注意改成你⾃⼰的⽂件序号)
docker exec -i storage fdfs_download_file /etc/fdfs/client.conf
group1/M00/00/00/wKgBW10lZHCAC8TaAAAAMT6WPfM3645854- 查看集群状态
docker exec -i storage fdfs_monitor /etc/fdfs/storage.conf7. 开发一个自定义 fastdfs-starter
⼀、主要实现的功能
实现 FastDFSClientUtil 及 properties 的⾃动装配(如何开发⼀个⾃定义的 spring-boot-starter)
加⼊连接线程池管理
⼆、实现 FastDFSClientUtil 及 properties 的⾃动装配
实际上就是要⾃⼰实现⼀个 starter
第⼀步:创建项⽬
第⼆步:引⼊ maven 依赖
<?xml version="1.0" encoding="UTF-8"?>
<project xmlns="http://maven.apache.org/POM/4.0.0" xmlns:xsi="http://www.w3.org/2001/XMLSchema-instance"
         xsi:schemaLocation="http://maven.apache.org/POM/4.0.0 https://maven.apache.org/xsd/maven-4.0.0.xsd">
    <modelVersion>4.0.0</modelVersion>

    <parent>
        <groupId>org.springframework.boot</groupId>
        <artifactId>spring-boot-starter-parent</artifactId>
        <version>2.6.6</version>
        <relativePath/> <!-- lookup parent from repository -->
    </parent>

    <groupId>top.syhan</groupId>
    <artifactId>syhan-fastdfs-spring-boot-starter</artifactId>
    <version>0.0.1-SNAPSHOT</version>

    <name>syhan-fastdfs-spring-boot-starter</name>

    <properties>
        <java.version>11</java.version>
    </properties>
    <dependencies>
        <dependency>
            <groupId>org.springframework.boot</groupId>
            <artifactId>spring-boot-configuration-processor</artifactId>
            <optional>true</optional>
        </dependency>

        <dependency>
            <groupId>org.springframework.boot</groupId>
            <artifactId>spring-boot-autoconfigure</artifactId>
        </dependency>

        <dependency>
            <groupId>net.oschina.zcx7878</groupId>
            <artifactId>fastdfs-client-java</artifactId>
            <version>1.27.0.0</version>
        </dependency>

        <dependency>
            <groupId>org.apache.commons</groupId>
            <artifactId>commons-pool2</artifactId>
        </dependency>
    </dependencies>

    <build>
        <plugins>
            <plugin>
                <groupId>org.springframework.boot</groupId>
                <artifactId>spring-boot-maven-plugin</artifactId>
            </plugin>
        </plugins>
    </build>

</project>
其中 spring-boot-configuration-processor 的作⽤是编译时⽣成 spring-configuration-metadata.json, 此⽂件主要给 IDE 使⽤,⽤于提示。
fastdfs-client-java 和 commons-pool2 是实现 fastdfs 功能及连接池的,与⾃动装配⽆关。
第三步:FastDFS 属性类 FastDFSProperties
package top.syhan.boot.fastdfs;

import org.springframework.boot.context.properties.ConfigurationProperties;

import java.util.ArrayList;
import java.util.List;

/**
 * @program: fastdfs-spring-boot-starter
 * @description:
 * @author: SYH
 * @create: 2022-04-14 20:58
 **/

@ConfigurationProperties(prefix = "syhan.fastdfs")
public class FastDFSProperties {

    private Integer connect_timeout = 5;
    private Integer network_timeout = 30;
    private String charset = "UTF-8";
    private List<String> tracker_server = new ArrayList<>();
    private Integer max_total;
    private Boolean http_anti_steal_token = false;
    private String http_secret_key = "";
    private Integer http_tracker_http_port = 8987;
    //下面这个实际上不是fastdfs的属性,为了方便实用自定义属性,表示访问nginx的http地址
    private String httpserver;

    public Integer getHttp_tracker_http_port() {
        return http_tracker_http_port;
    }

    public void setHttp_tracker_http_port(Integer http_tracker_http_port) {
        this.http_tracker_http_port = http_tracker_http_port;
    }

    public Boolean getHttp_anti_steal_token() {
        return http_anti_steal_token;
    }

    public void setHttp_anti_steal_token(Boolean http_anti_steal_token) {
        this.http_anti_steal_token = http_anti_steal_token;
    }

    public String getHttp_secret_key() {
        return http_secret_key;
    }

    public void setHttp_secret_key(String http_secret_key) {
        this.http_secret_key = http_secret_key;
    }

    public Integer getMax_total() {
        return max_total;
    }

    public void setMax_total(Integer max_total) {
        this.max_total = max_total;
    }

    public String getHttpserver() {
        return httpserver;
    }

    public void setHttpserver(String httpserver) {
        this.httpserver = httpserver;
    }

    public List<String> getTracker_server() {
        return tracker_server;
    }

    public void setTracker_server(List<String> tracker_server) {
        this.tracker_server = tracker_server;
    }

    public Integer getConnect_timeout() {
        return connect_timeout;
    }

    public void setConnect_timeout(Integer connect_timeout) {
        this.connect_timeout = connect_timeout;
    }

    public Integer getNetwork_timeout() {
        return network_timeout;
    }

    public void setNetwork_timeout(Integer network_timeout) {
        this.network_timeout = network_timeout;
    }

    public String getCharset() {
        return charset;
    }

    public void setCharset(String charset) {
        this.charset = charset;
    }
}
其余如 Base64 ⼯具类、FastDFSClient、FastDFSClientFactory、FastDFSClientPool 等查看代码
第四步:⾃动装配配置类
package top.syhan.boot.fastdfs;
/**
* @program: fastdfs-spring-boot-starter
* @description:
* @author: SYH
* @create: 2022-04-14 20:59
**/
import org.springframework.beans.factory.annotation.Autowired;
import org.springframework.boot.autoconfigure.condition.ConditionalOnClass;
import org.springframework.boot.autoconfigure.condition.ConditionalOnMissingBean;
import org.springframework.boot.context.properties.EnableConfigurationProperties;
import org.springframework.context.annotation.Bean;
import org.springframework.context.annotation.Configuration;
/**
* 实现最终目标把FastDFSClientUtil自动注入Spring,提供外部使用
*/
@Configuration
//当classpath下面有这三个类才做自动装配
@ConditionalOnClass(value = {FastDFSClientFactory.class,FastDFSClientPool.class,FastDFSClientUtil.class,})
//@EnableConfigurationProperties 相当于把使用 @ConfigurationProperties的类注入。
@EnableConfigurationProperties(FastDFSProperties.class)
public class AutoConfigure {
private final FastDFSProperties properties;
@Autowired
public AutoConfigure(FastDFSProperties properties) {
this.properties = properties;
}
@Bean
FastDFSClientPool fastDFSClientPool(){
return new FastDFSClientPool(properties);
}
@Bean
@ConditionalOnMissingBean
//当没有FastDFSClientUtil,就把FastDFSClientUtil作为Bean注入Spring
FastDFSClientUtil fastDFSClientUtil (){
return new FastDFSClientUtil(properties);
}
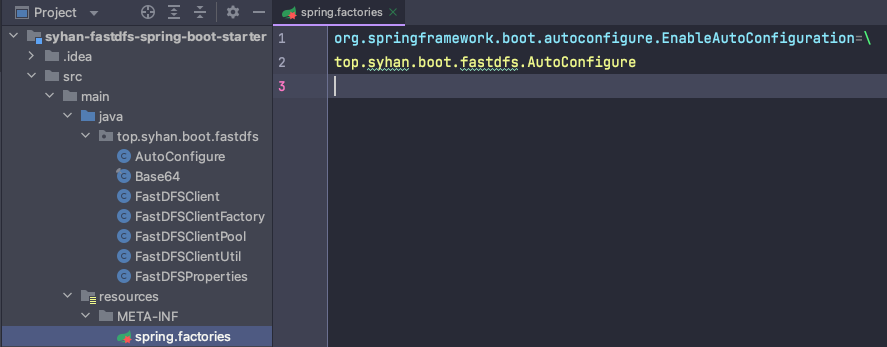
}第五步:在 resources/META-INF/下创建 spring.factories ⽂件
org.springframework.boot.autoconfigure.EnableAutoConfiguration=\
top.syhan.boot.fastdfs.AutoConfigure
三、总结 Starter 的⼯作原理
- Spring Boot 在启动时扫描项⽬所依赖的 JAR 包,寻找包含 spring.factories ⽂件的 JAR 包
- 根据 spring.factories 配置加载 AutoConfigure 类
- 根据 @Conditional 注解的条件,进⾏⾃动配置并将 Bean 注⼊ Spring Context
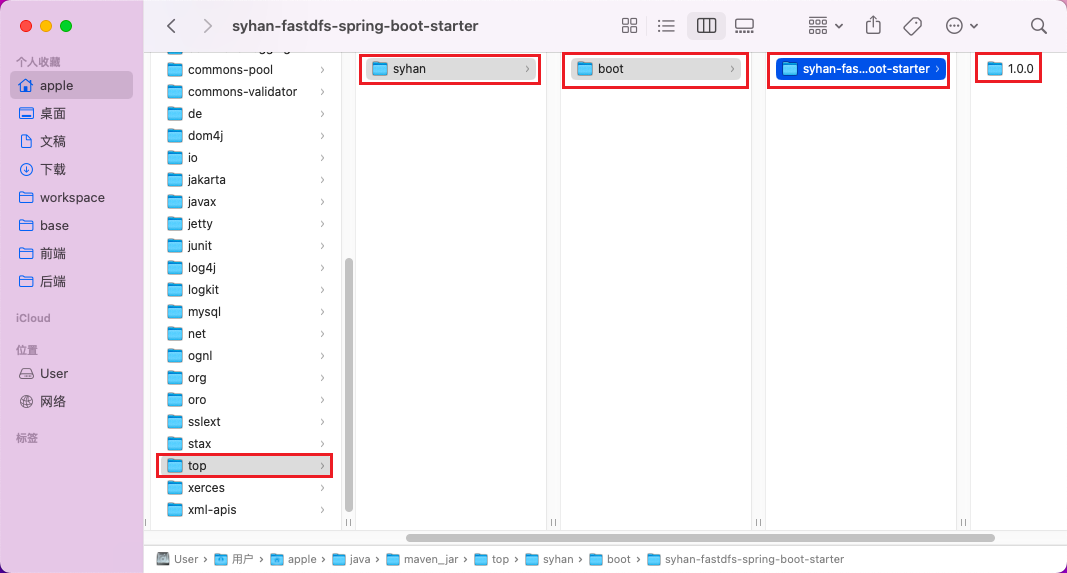
四、打包安装
依次执⾏ mvn clean、mvn install 命令,在本地仓库安装成功
8. 整合 fastdfs 操作文件数据
- 在需要上传⽂件的项⽬中引⼊ maven 依赖坐标
<dependency>
    <groupId>top.syhan.boot</groupId>
    <artifactId>syhan-fastdfs-spring-boot-starter</artifactId>
    <version>1.0.0</version>
</dependency>- 写配置
syhan:
 fastdfs:
   httpserver: http://124.222.178.129:8888/ # 在使⽤FastDFSClientUtil会得到完 整的http⽂件访问路径
   connect_timeout: 5
   network_timeout: 30
   charset: UTF-8
   tracker_server: # tracker_server 可以配置成数组
     - 124.222.178.129:22122
   max_total: 50
   http_anti_steal_token: false # 如果有防盗链的话,这⾥true
http_secret_key: # 有防盗链,这⾥填secret_key- 写上传接⼝
@RestController
@RequestMapping(value = "fastdfs")
public class FastDfsController {
    @Resource
    private FastDFSClientUtil fastDFSClientUtil;
    @PostMapping("/upload")
    public AjaxResponse upload(@RequestParam("file") MultipartFile file) {
        String fileId;
        try {
            String originalFileName = file.getOriginalFilename();
            assert originalFileName != null;
            fileId = fastDFSClientUtil.uploadFile(file.getBytes(),originalFileName.substring(originalFileName.lastIndexOf(".")));
            return AjaxResponse.success(fastDFSClientUtil.getSourceUrl(fileId));
       } catch (Exception e) {
            throw new CustomException(CustomExceptionType.SYSTEM_ERROR,"⽂件上传图⽚服务器失败");
       }
   }
}- postman 测试
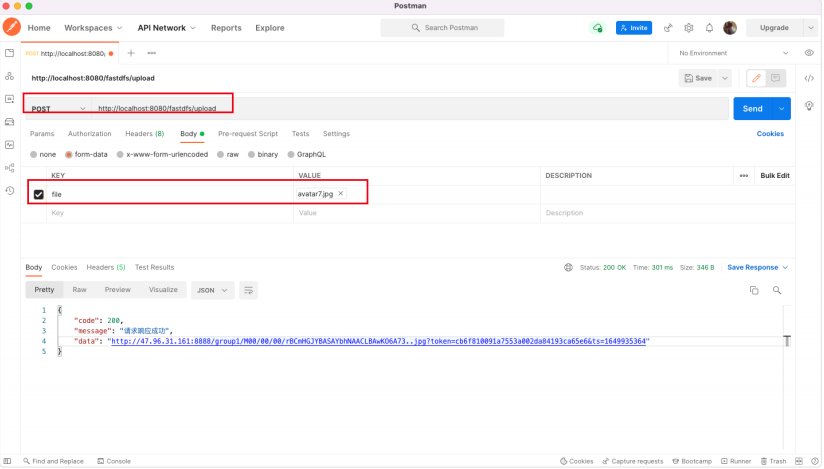
- 访问返回的图⽚地址,可以成功访问到上传的图⽚